Change the registration status of guests in the guest list
Change Registration Status
Not all guests use the option to register or cancel their attendance online via the event website. Here’s how you can manually change the status of one or more guests.
The following registration statuses are available in Invitario:
- Unknown: There is no response to the invitation yet. This status is assigned when a new guest is created or imported.
- Registered: The guest has confirmed attendance at the event.
- Canceled: The guest has declined the invitation.
If you want to manually register or cancel a guest for an event, you can do so using one of the following options:
Option 1: Change status via "Select Action"
Use this option to update the status of one or more guests without sending a confirmation email. If you want to send a confirmation email after changing the status, you can also do this via "Select Action".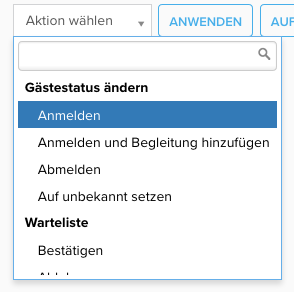 Steps to change guest status:
- Go to > Guests.
- Select one or more guests. Check the box in front of each guest.
- Scroll to the bottom of the guest list and click the "Select Action" dropdown.
- Select the desired status from the "Change Guest Status" section to change the registration status.
- Confirm your selection by clicking the "Apply to selected" button (right next to the dropdown).
- Confirm the security question and proceed with changing the guest status.
Option 2: Change status via "Edit Guest"Use this option to change the status of a single guest. As with Option 1, the guest will not receive a confirmation email.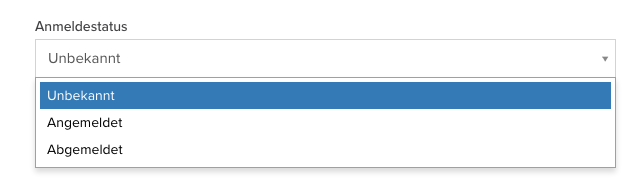 Steps to change guest status:
- Go to > Guests.
- Click on the guest's name to edit the guest.
- Switch to the view of the second tab with the event name.
- Select the desired status from the "Registration Status" dropdown and save the entry.
Option 3: Change status via the event websiteIf you want to register or cancel a guest with the automatic sending of a confirmation email, you can use this option. Through the event website, you follow the registration or cancellation process from the guest's perspective and make the status change on behalf of the guest. This also allows you to edit accompaniments – if enabled for your event.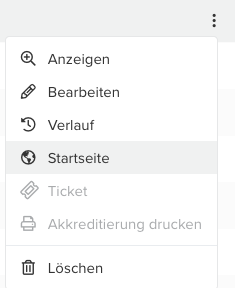 Steps to change guest status:
- Go to > Guests.
- Select the "Homepage" option in the quick menu of the respective guest. You will now be directed to the event website as this guest.
- Complete the registration or cancellation process on the event website and confirm your selection.
- After confirmation, the registration or cancellation confirmation will be displayed in the browser and – if set – an automatic confirmation email will be sent.
Option 4: Change status via the backend form (PRO and ENTERPRISE only)You can create a custom form in > Forms that is only accessible via the backend. This option is available in > Forms in the form list under the quick menu. Backend forms offer the convenience of a web form for easier data entry, as offered on the event website, while allowing you to disable certain functions in the backend form, such as sending confirmation emails or hiding fields, such as accepting privacy policies.
 Steps to change guest status:
- Go to > Guests.
- Select the "Backend Form" option in the quick menu of the respective guest. The form will now open in the backend.
- Complete the registration or cancellation process and close the form.
Related Articles
Using the guest list
The guest list The guest list page in an event contains a number of options for editing guest data, registering or deregistering guests, to send emails to guests, assign them to categories, to search for and filter them. To open the guest list, click ...Which columns are output in the guest list export file?
When exporting the guest list, all fields (master data, event-specific fields, etc.) as well as the registration status and, if applicable, check-in status are exported and displayed in separate columns. You can find the guest list in the event under ...Importing contacts to an event's guest list
In the "Guests" menu, you can bulk upload the invitation list with your contacts. Preparation for the import Only CSV files are supported for importing contacts into Invitario. Tips for creating import files can be found here. To convert a file to ...Manual registration of the accompanying person
The manual registration of companions is done via the "Guests" menu: Select the guest or guests to whom a companion should be added. Go to the end of the guest list and select "Register and add companion" from the "Choose action" dropdown, then click ...Mass updating of guest data
You can expand, update, or delete the data stored in your guest list in one operation This allows you to easily adjust your already imported guest or contact list. You can perform a mass update for selected guests, the entire guest list of an event, ...